Turn one podcast into multiple assets and 50% more engagement
Podcasts take work, so get the most mileage out of them that you can. Follow these 6 steps and get all the prompts you need.

Producing a quality podcast is expensive, and not just when it comes to the budget.
There’s also strategy, opportunity sourcing, pitching, ideation, prep, technical setup, promotion, and beyond. Marketers often set out to do the fun, creative work, but end up running all the logistics behind the scenes too. And no one seems to challenge this reality.
Then, too often, we publish that hard-earned podcast episode, share it once, and forget about it. That is the problem this workflow solves.
The system below takes one strong source asset (in this case, a podcast) and turns it into a campaign asset, a lead magnet, a blog post, plus the distribution around it: LinkedIn posts and emails. Across similar campaigns, that repeatable system has driven 50–100% higher social engagement, 30–50% email open rates, and 200+ monthly lead magnet downloads.
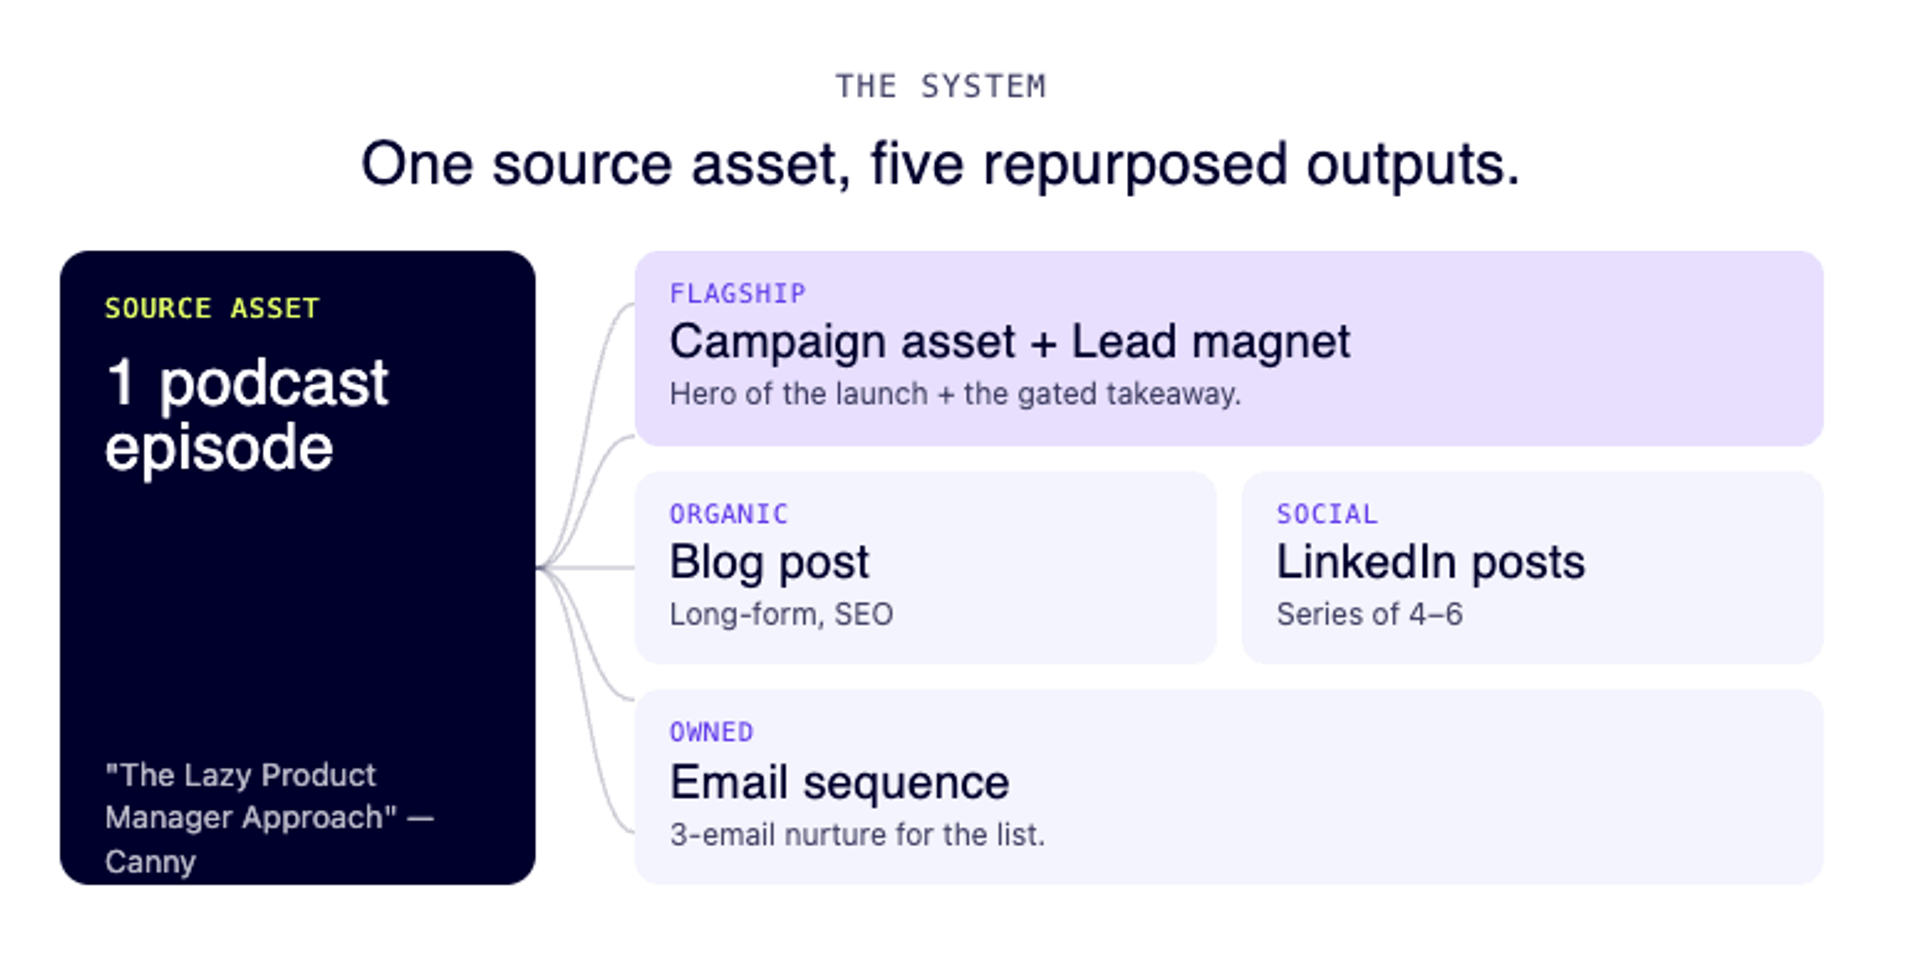
For this example, we’ll repurpose this podcast episode from Canny (a customer feedback tool): The Lazy Product Manager Approach.
This system will help you stop wasting your creative energy on manual repurposing. Here’s how to automate it so you focus on strategy.
Remember: The seed of thought should start with you. AI helps you bring it to life.
What this system runs on
This workflow was built in AirOps.
AirOps lets you create repeatable content workflows / structured prompt sequences.
You no longer need to start from scratch for each derivative piece of content. Instead, you build a workflow and define everything once:
- Your knowledge base and brand kit
- The input (podcast, blog, notes)
- The steps (read → analyze → extract → write)
- How outputs feed the next stage
Let’s walk through building each one of these.
You can replicate this in ChatGPT, Claude, Make, Clay, or similar content software.
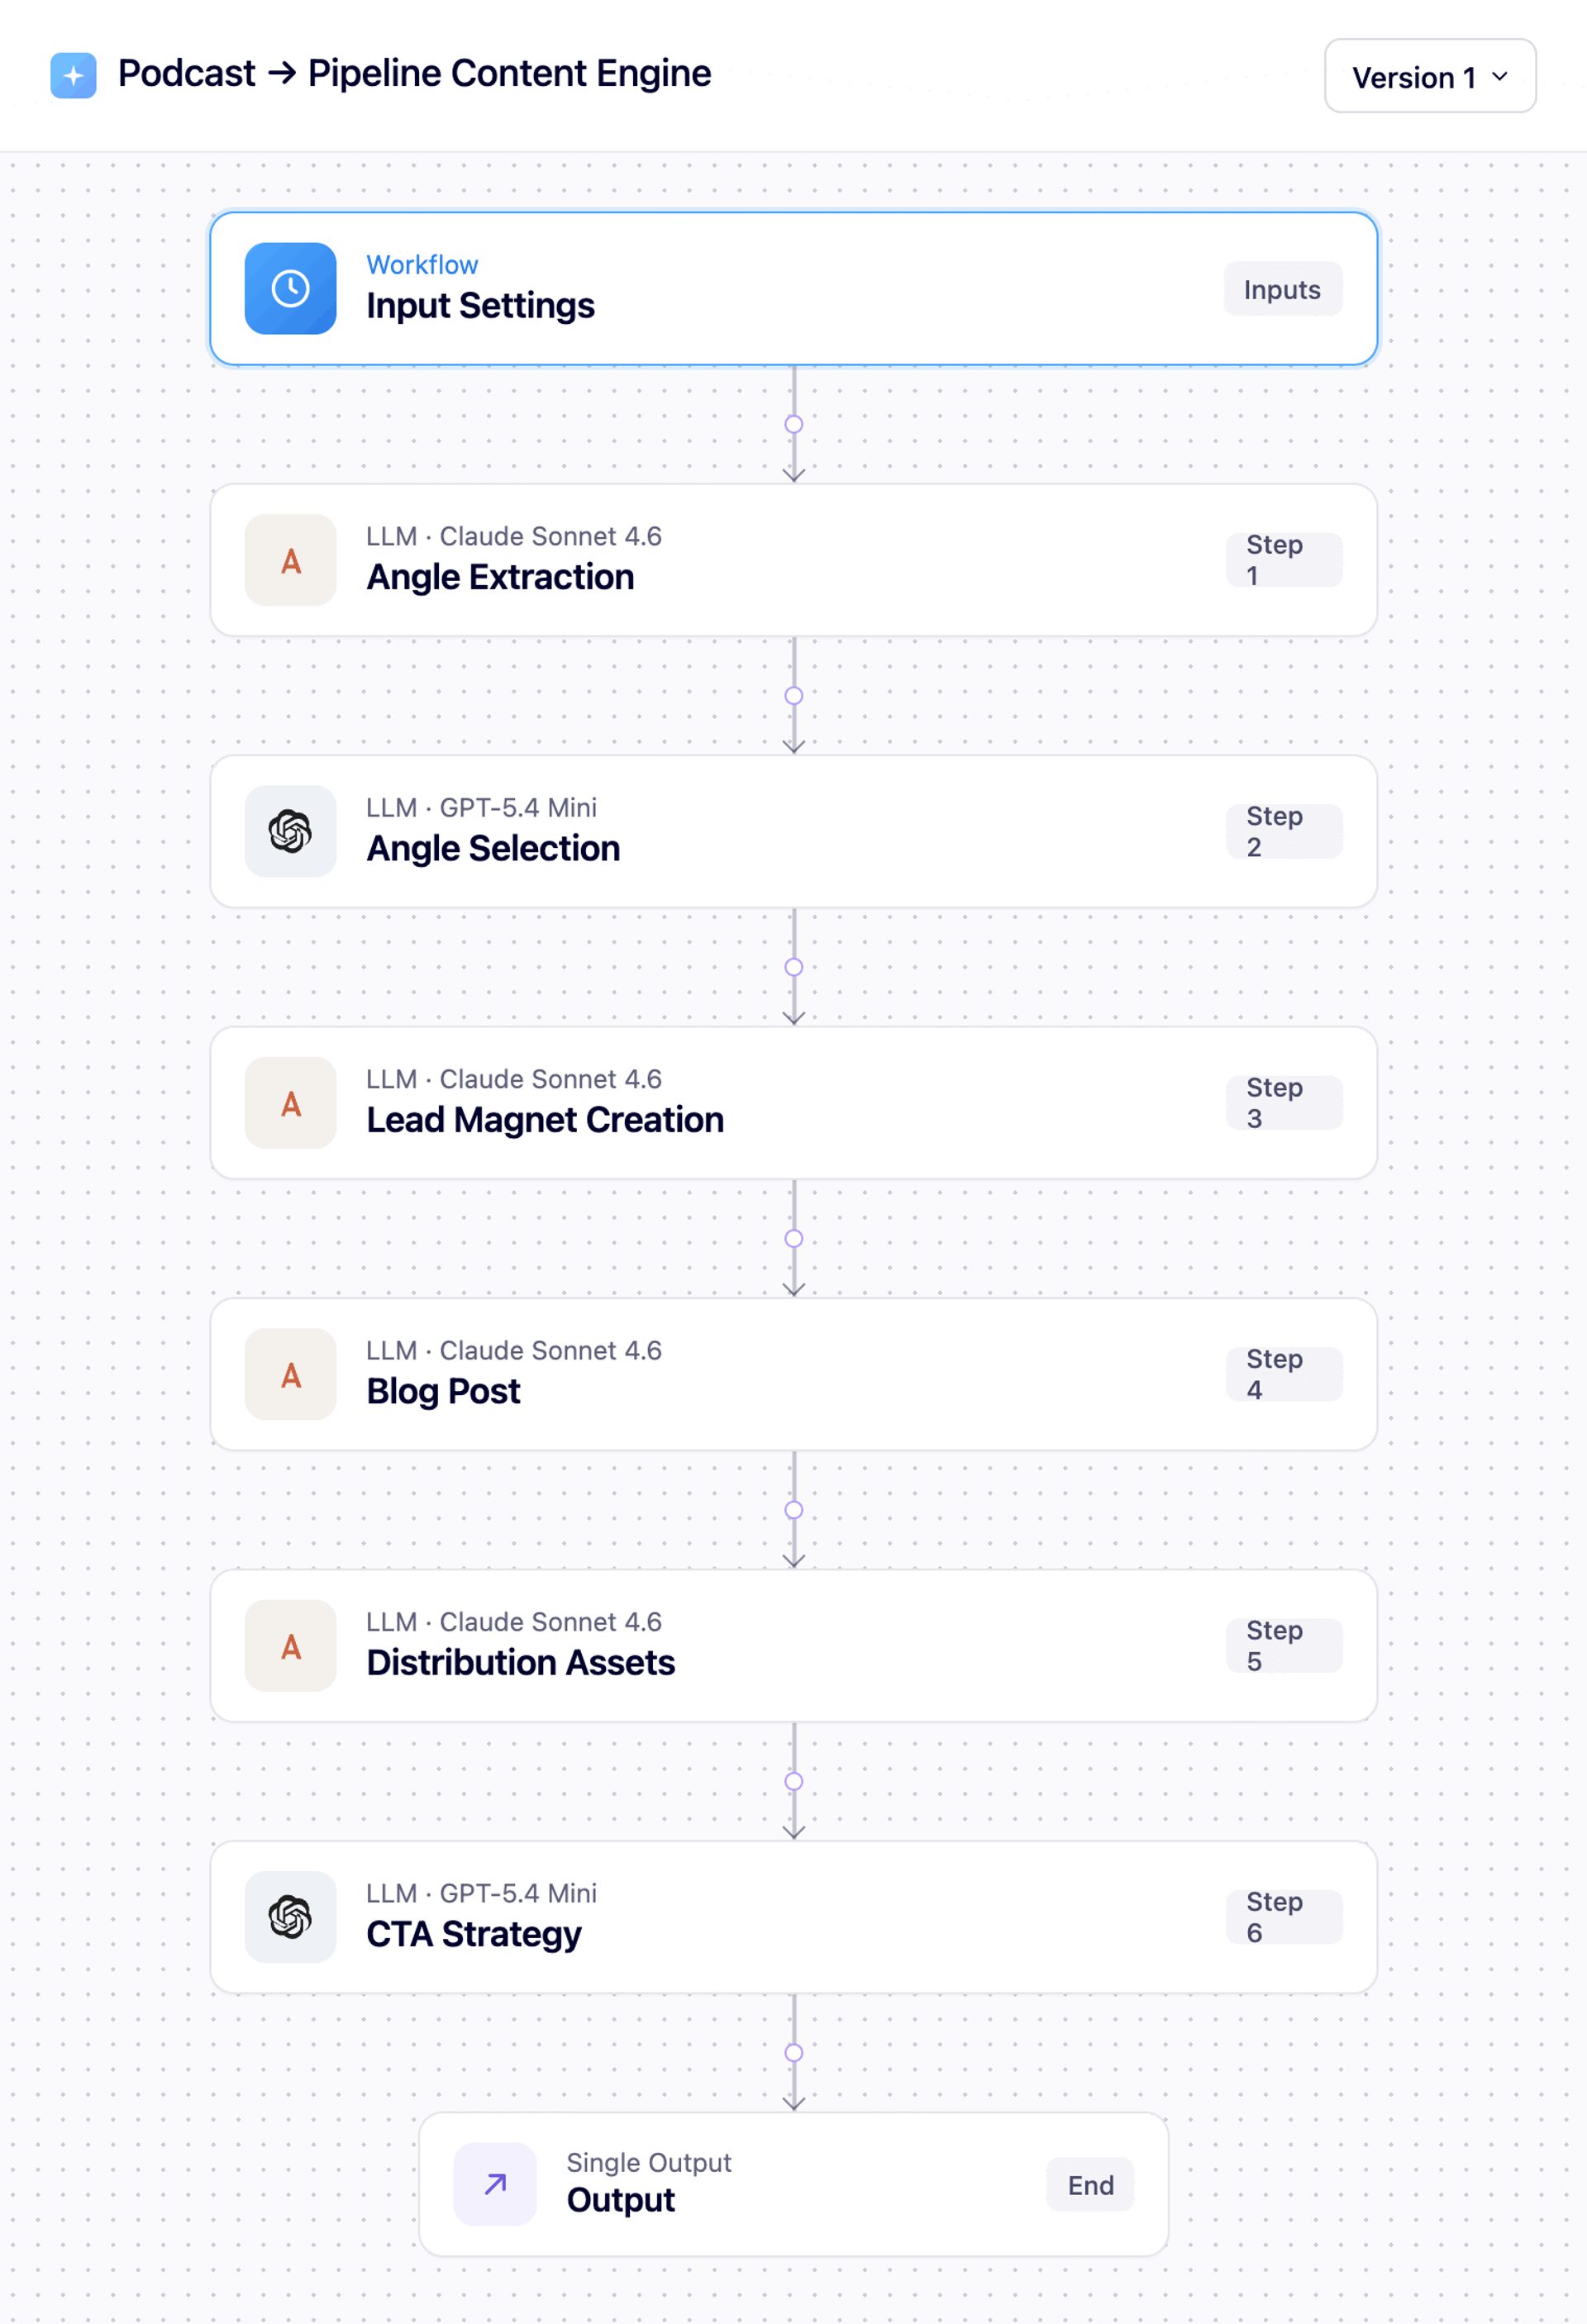
Complete AirOps content engine workflow
Note: This workflow identifies the most fitting LLM model for each step and uses ChatGPT and Claude. You can pick any LLM and model that you prefer, or let the system decide.
The workflow
Step 1: Set up the knowledge base
Load your content (website, docs, past pieces) into AirOps to give it context. The workflow references your knowledge base, so it’ll learn from your existing content. Consider adding:
- Your website URL (AirOps can auto-build a site map from it)
- Additional sites/web pages (landing pages, support sites, etc.)
- Your competitors’ URLs (so you can easily reference them in your workflows)
- Product descriptions, messaging, positioning, and similar internal documents
- ICP, targeting, buyer persona and other targeting documentation
- Competitive/comparison documents and battle cards
You won’t have to describe your company, target audience, industry, competitors, and other specifics every time if you are creating this workflow with AirOps. It will already know. However, calibrate to whatever system you happen to be using. As a rule, more detail is usually better.
Don’t worry if you don’t have all of the above. Upload whatever you have and continue adding new documents as you develop them.
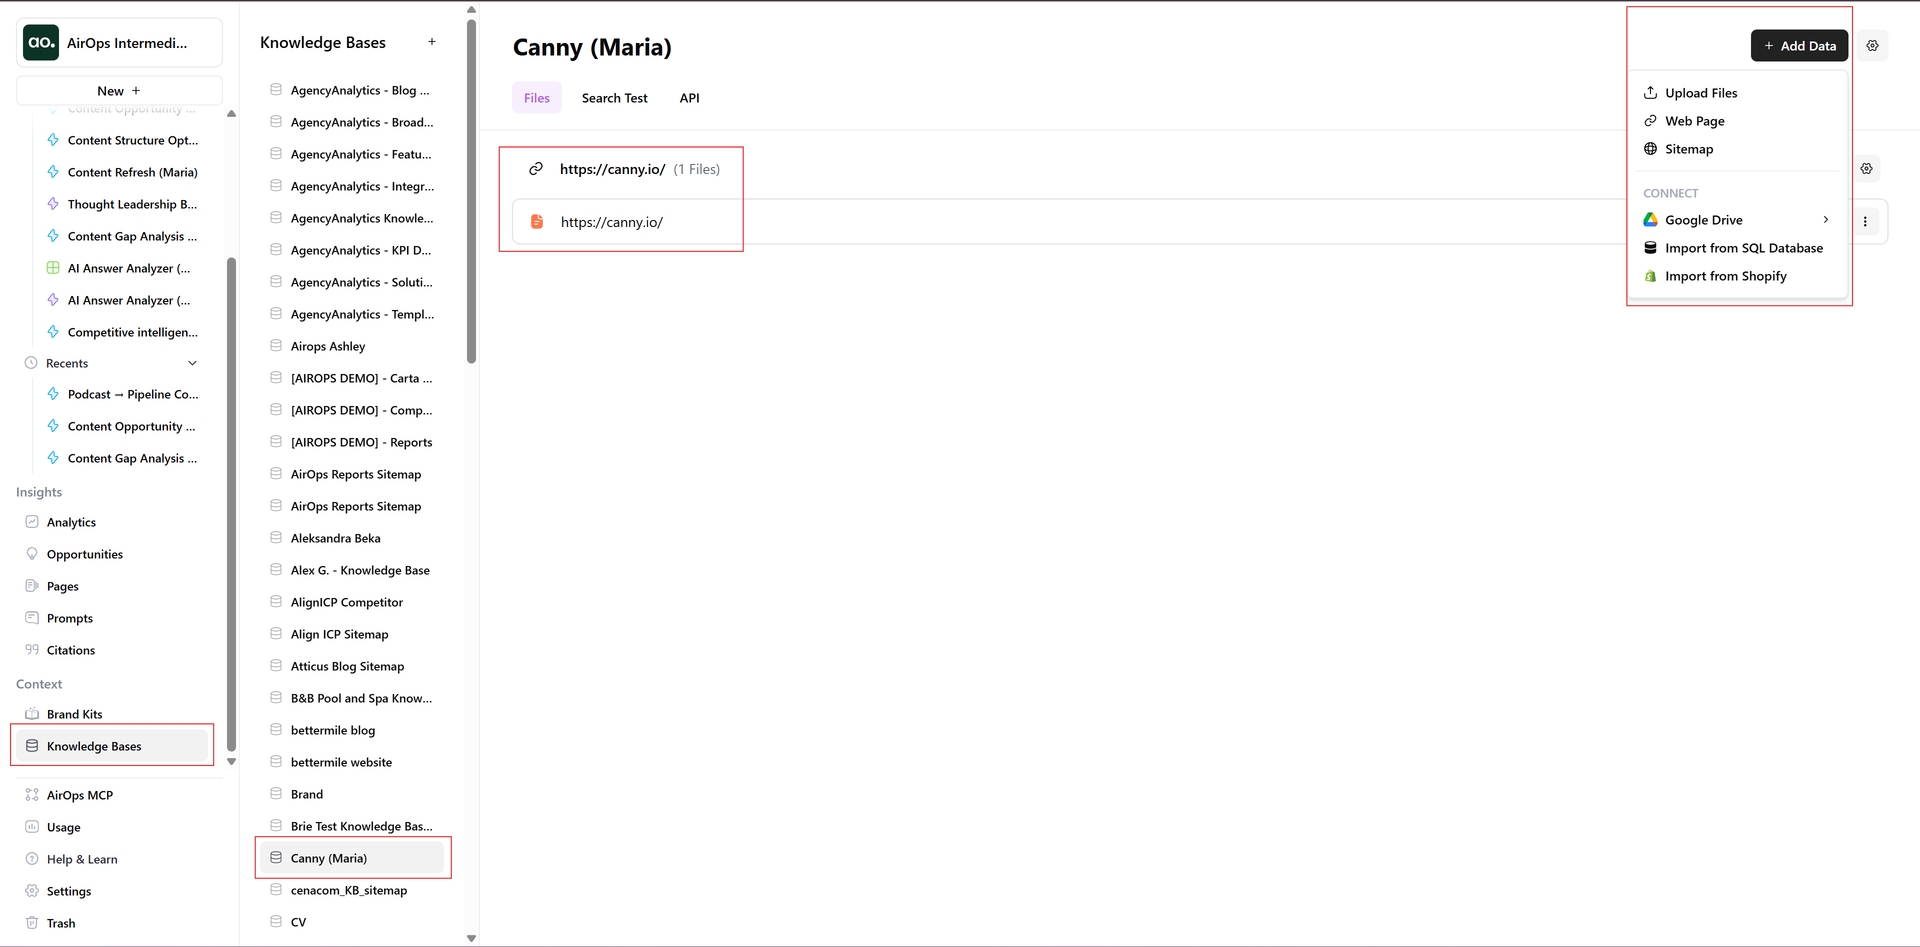
Knowledge base creation process in AirOps featuring at least one data source (e.g. can be a URL)
Once you have at least one data source (a homepage URL in this example) in your knowledge base, AI will have a frame of reference for all content outputs.
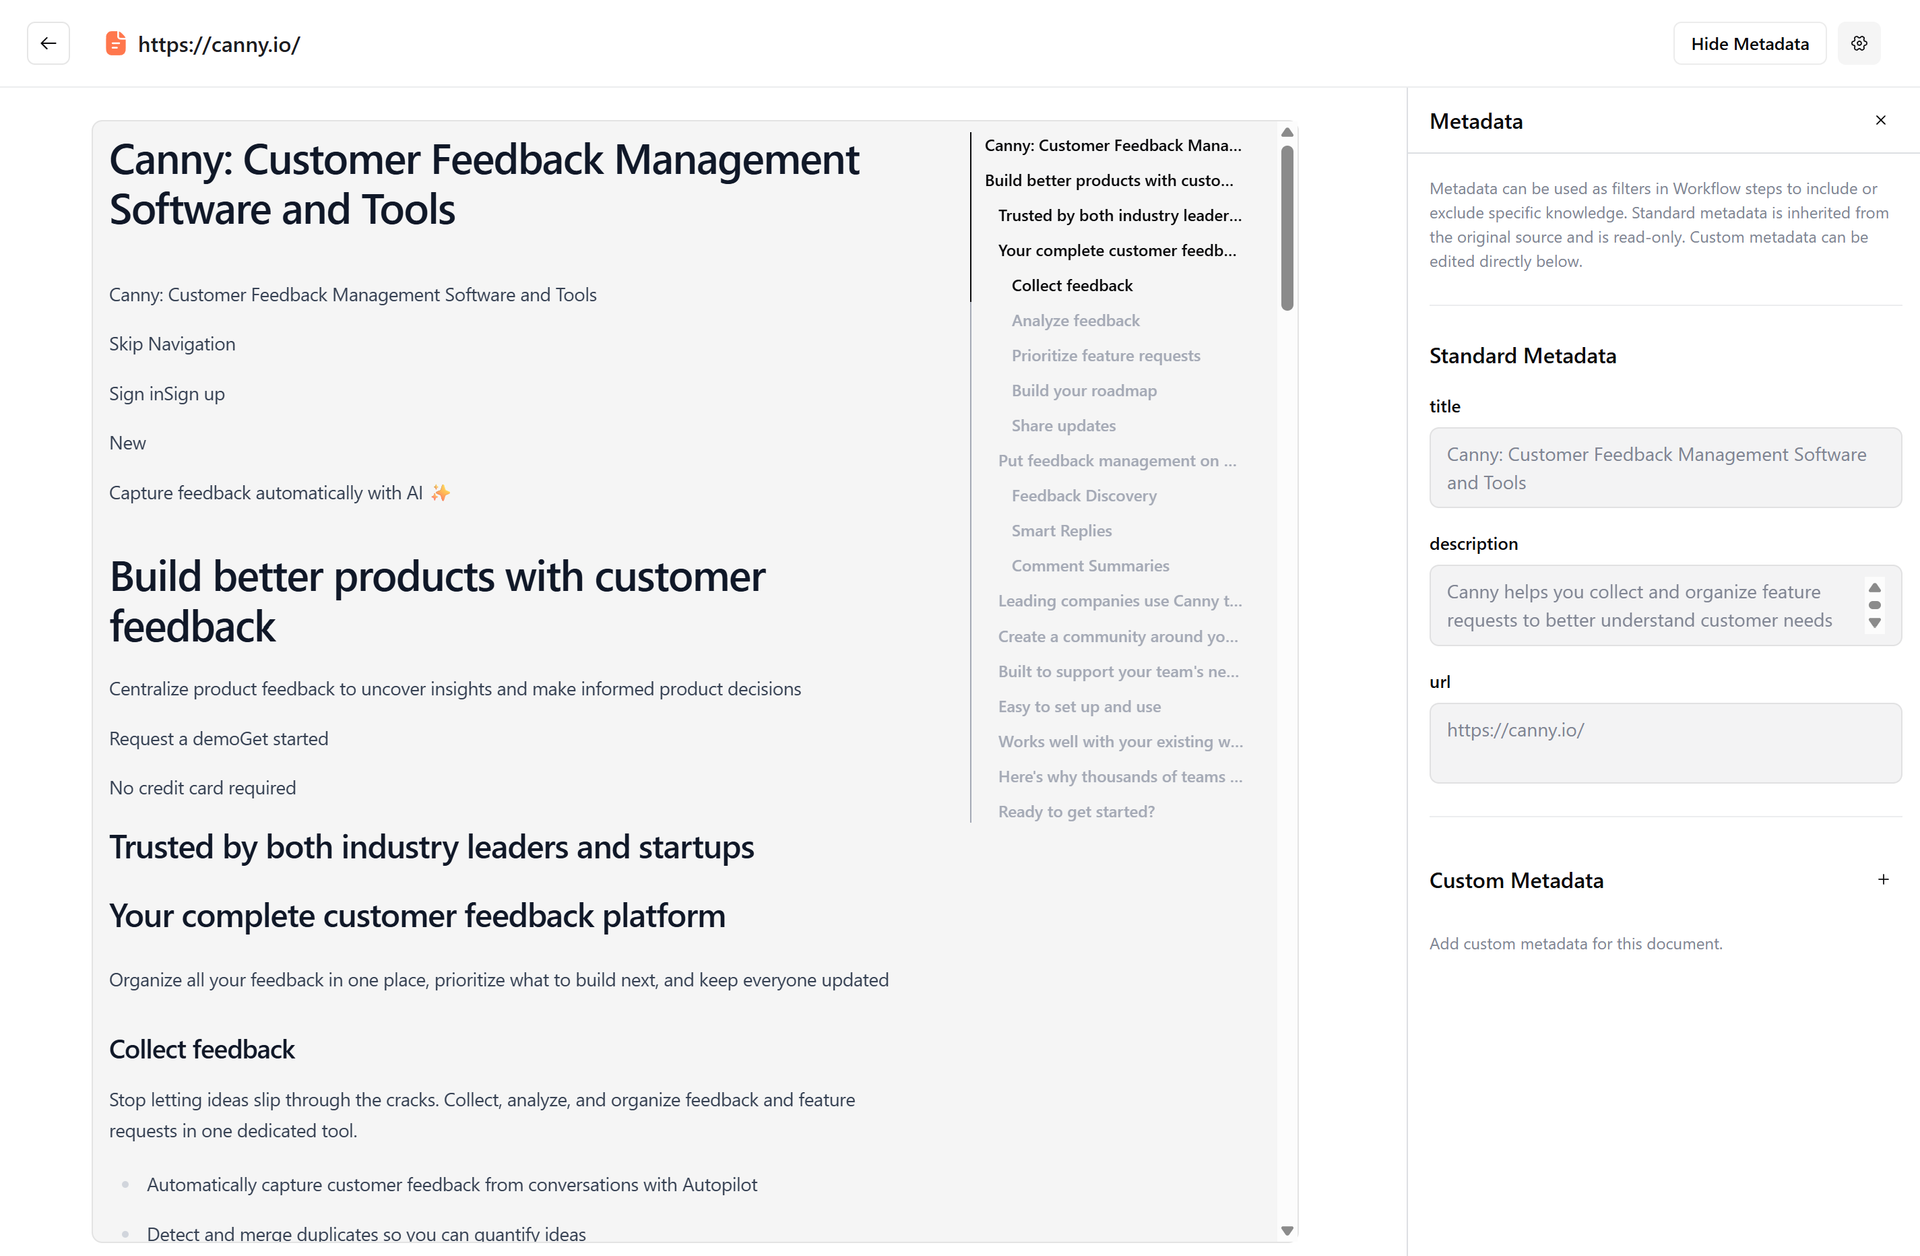
Auto-generated knowledge base using data pulled from your website URL
Step 2: Create a brand kit
And I’m not talking about your colors, logos, and approved stock photos. This brand kit will inform the writing style of outputs.
To create a brand kit, you can either:
- Upload an existing brand voice/tone & style guide if you have one; or
- Paste a sample (or a few) of your writing (blog post, guide, LinkedIn post, email, etc). AirOps can analyze it and auto-populate specific Brand Kit fields such as tone, persona, writing rules, and more.
Then you can manually add various product lines, audiences, regions, and more. The more specific content you give it, the better your future outputs will be.
Side note: If you’re anything like me, you get an eye twitch every time you get a ChatGPT-generated copy with em dashes. Unless you specify every time that you prefer to avoid them (and honestly, not even then), ChatGPT will sneak them in. Custom GPT with the integrated brand voice doc? Still fails. This is why a brand kit is so important.
Step 3: Build a workflow
Content marketers, especially the creative kind, don’t wake up every day dreaming of building workflows—I get it. But it’s much faster and simpler than you might imagine.
The main thing here is “systems thinking” versus “workflow setup”. We’re going to build a workflow that follows Read → Analyze → Extract → Write logic
1. Input: one podcast
But before we start to repurpose, we have to do some groundwork. Before jumping into “repurposing,” we’ll first ask the workflow to read and analyze it. This is what will differentiate our content output from generic AI slop.
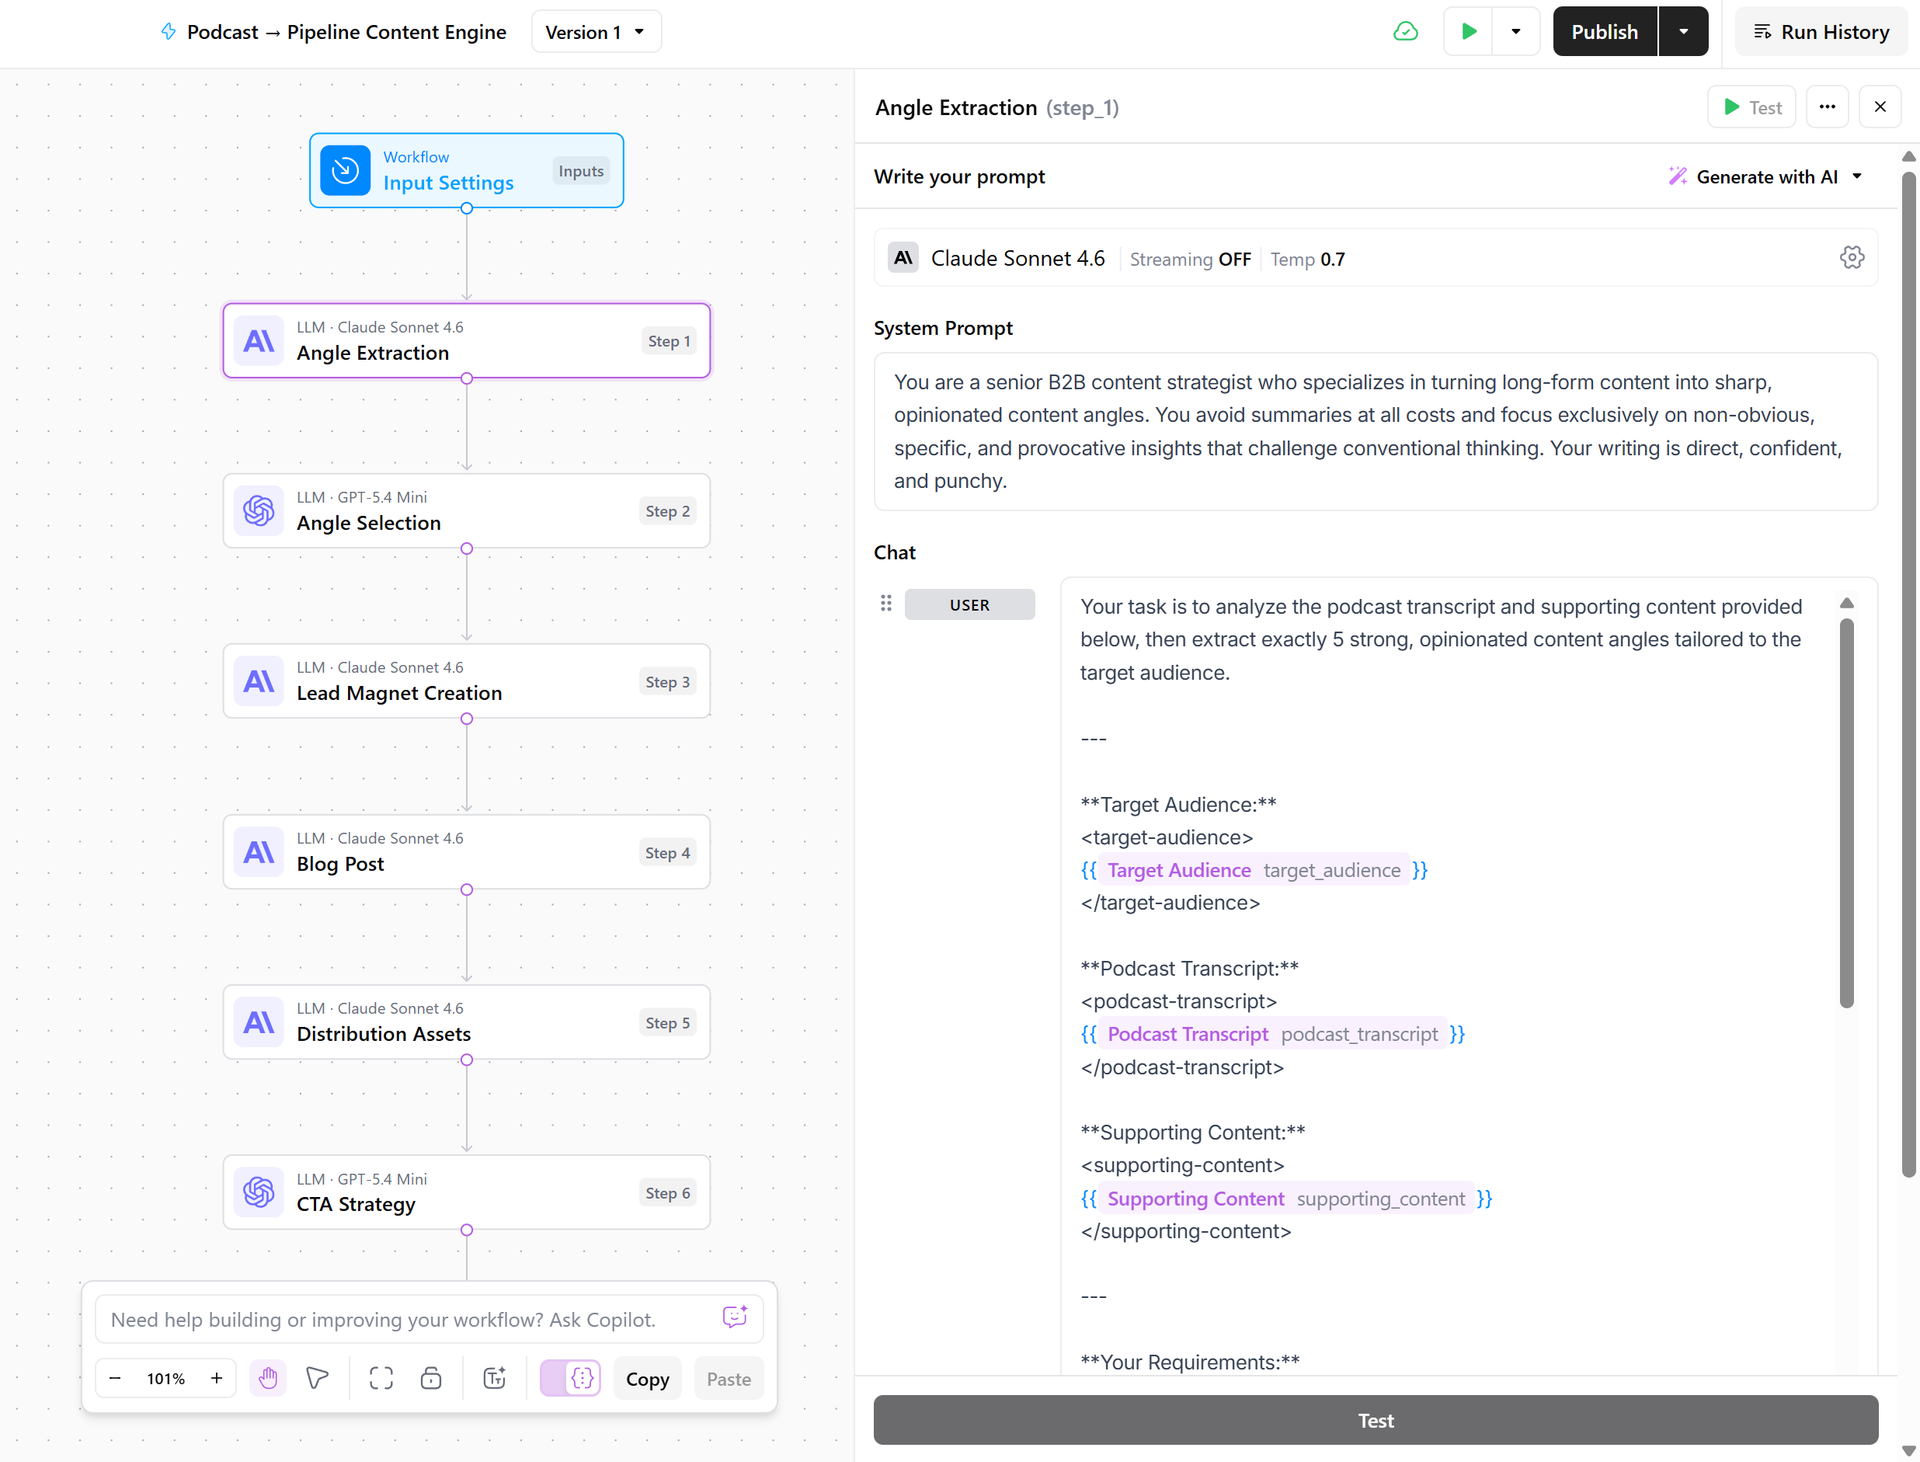
2. Look for strong content angles (Read)
Most teams go straight from content to writing. That’s where things break.
Instead, start by identifying what’s actually worth saying.
Content angle analysis prompt
You are a senior B2B content strategist who specializes in turning long-form content into sharp, opinionated content angles. You avoid summaries at all costs and focus exclusively on non-obvious, specific, and provocative insights that challenge conventional thinking. Your writing is direct, confident, and punchy.
Your task is to analyze the podcast transcript and supporting content provided below, then extract exactly 5 strong, opinionated content angles tailored to the target audience.
—
Target Audience:
<target-audience>
{{target_audience}}
</target-audience>
Podcast Transcript:
<podcast-transcript>
{{podcast_transcript}}
</podcast-transcript>
Supporting Content:
<supporting-content>
{{supporting_content}}
</supporting-content>
—
Your Requirements:
- Do NOT summarize the transcript or supporting content. Summaries are strictly forbidden.
- Each angle must be non-obvious—avoid surface-level takeaways or anything the target audience already knows.
- Each angle must be specific and grounded in something actually said or implied in the transcript or supporting content. Do not invent ideas that aren’t present in the source material.
- Each angle should feel opinionated and slightly provocative—it should make the target audience stop scrolling and think “I haven’t considered it that way before.”
- Write as if you are a confident, experienced practitioner speaking directly to peers—not a journalist summarizing a topic.
- Avoid vague language like “it’s important to” or “many companies struggle with.” Be direct and assertive.
- Each angle must be meaningfully different from the others—no overlapping themes or recycled ideas.
—
Output Format:
For each of the 5 angles, use the following structure exactly:
Angle [number]:
- Angle headline: One punchy, opinionated sentence (max 15 words). This should read like a bold LinkedIn post opener or article title—not a question, not a soft claim.
- Core idea: 2–3 sentences that unpack the angle. Be specific. Reference the insight from the source material. Explain the tension or contradiction that makes this interesting.
- Why it matters to the target audience: 2 sentences max. Connect the insight directly to a real pain point, decision, or opportunity that the target audience faces. Make it feel urgent and relevant.
Separate each angle with a horizontal rule (—) for readability.
Do not include any preamble, introduction, or closing remarks. Output only the 5 angles in the format described above.
Notice how the prompt has custom values for the target audience, podcast transcript and supporting content. To find those values, the workflow will go back to your knowledge base and brand kit. This is how your content goes from generic to unique and specific.
3. Select the strongest idea (Analyze + Extract)
Now we ask the workflow to choose one idea to build around.
Note: You can add steps to review each output step and course-correct. For example, you might disagree with AI on what “the strongest idea” is. This is where human judgment comes in. Before the workflow makes all the decisions for you (no matter how tempting that might sound), build in human review steps into your workflow.
Control the output step by step to get exactly what you need.
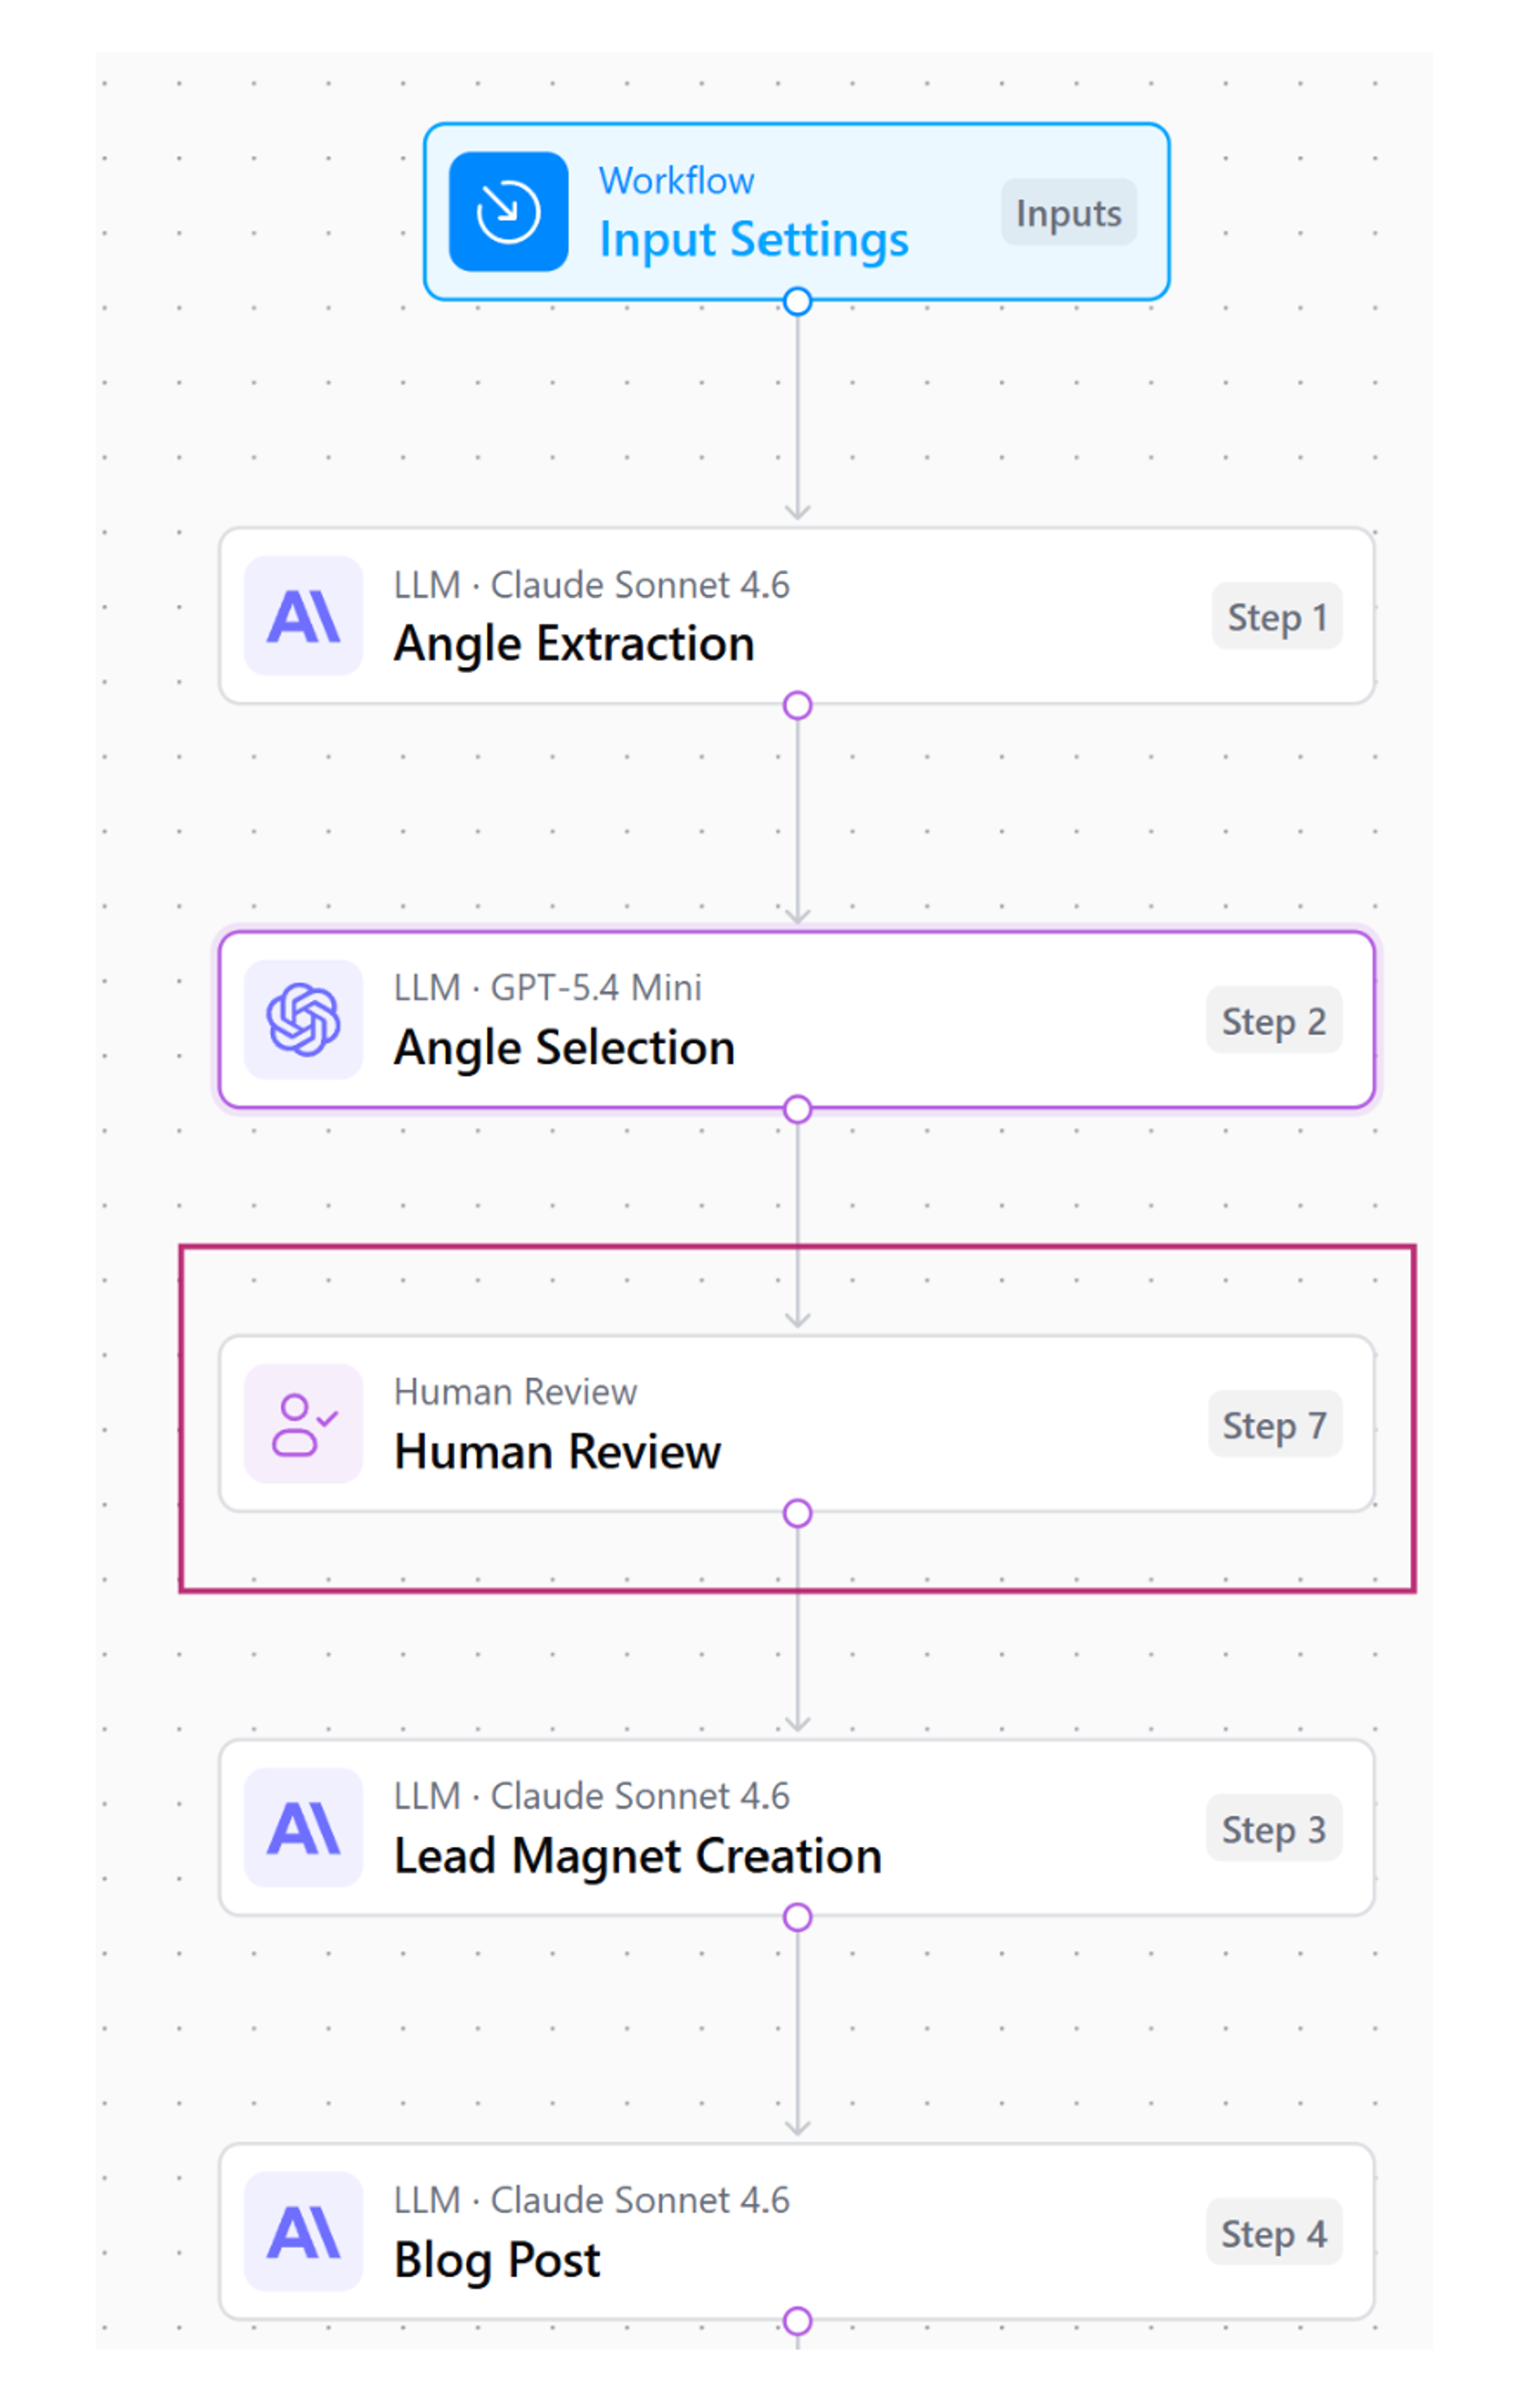
In this example, the workflow will ask you whether you agree with AI’s selection or not. If not, you can either review the rest of the ideas and pick another one, or provide feedback and re-run the workflow from the beginning. You stay in control. You dictate the strategy. AI is the hand that helps you build content.
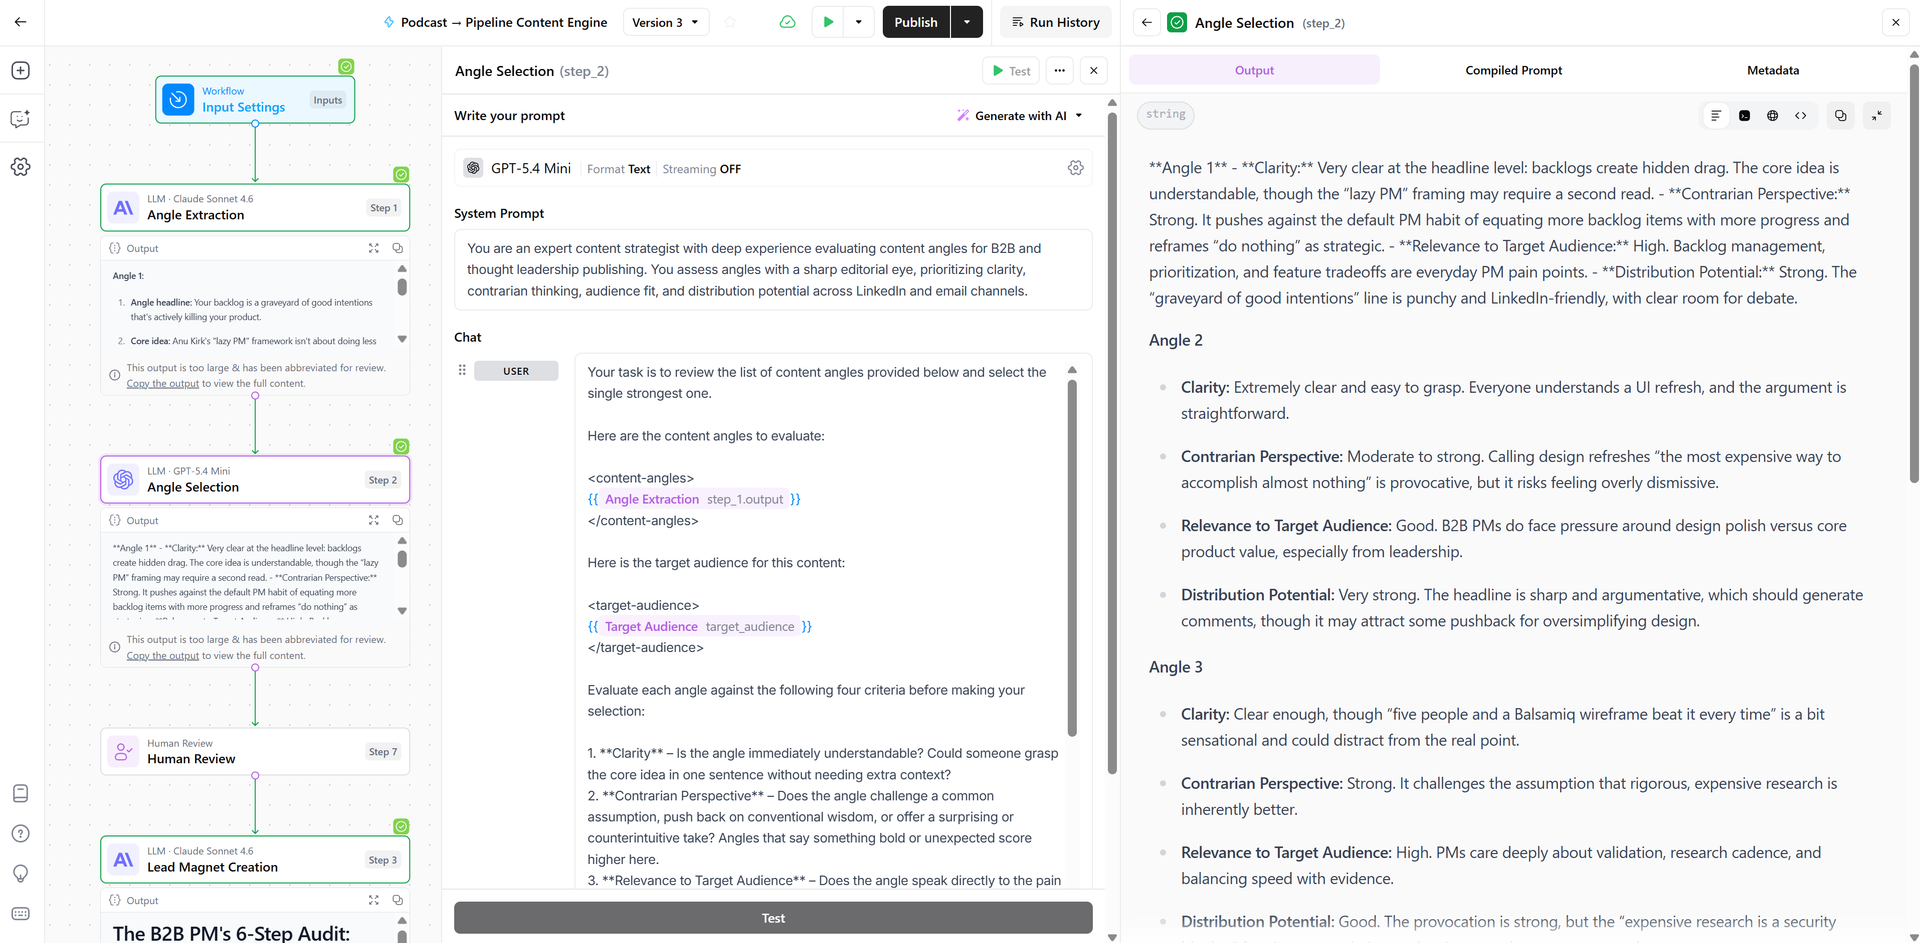
Evaluating content angles for publishing prompt
You are an expert content strategist with deep experience evaluating content angles for B2B and thought leadership publishing. You assess angles with a sharp editorial eye, prioritizing clarity, contrarian thinking, audience fit, and distribution potential across LinkedIn and email channels.
Your task is to review the list of content angles provided below and select the single strongest one.
Here are the content angles to evaluate:
<content-angles\>
{{step\_1.output}}
</content-angles>
Here is the target audience for this content:
<target-audience\>
{{target\_audience}}
</target-audience>
Evaluate each angle against the following four criteria before making your selection:
- Clarity: Is the angle immediately understandable? Could someone grasp the core idea in one sentence without needing extra context?
- Contrarian Perspective: Does the angle challenge a common assumption, push back on conventional wisdom, or offer a surprising or counterintuitive take? Angles that say something bold or unexpected score higher here.
- Relevance to Target Audience: Does the angle speak directly to the pain points, goals, or interests of the target audience described above? It should feel written for them, not just about a topic they might care about.
- Distribution Potential: Would this angle perform well on LinkedIn (i.e., spark engagement, shares, or comments) and in an email newsletter (i.e., drive opens and clicks)? Think about whether the hook is strong enough to stop a scroll or compel someone to open an email.
Instructions:
- First, briefly assess each angle against the four criteria above. Do this inside a <scratchpad> section. Be concise but specific—one or two sentences per criterion per angle is enough.
- Then, select the single best angle and write your final recommendation inside a <recommendation> section.
- In your recommendation, clearly state which angle you selected (quote it or label it clearly), then explain in 3–5 sentences why it outperforms the others. Reference at least two of the four criteria explicitly in your explanation.
- Your tone should be direct, confident, and editorial—like a senior editor giving clear guidance to a writer. Avoid vague praise. Be specific about what makes the winning angle stronger.
- Do not recommend more than one angle. Commit to a single choice.
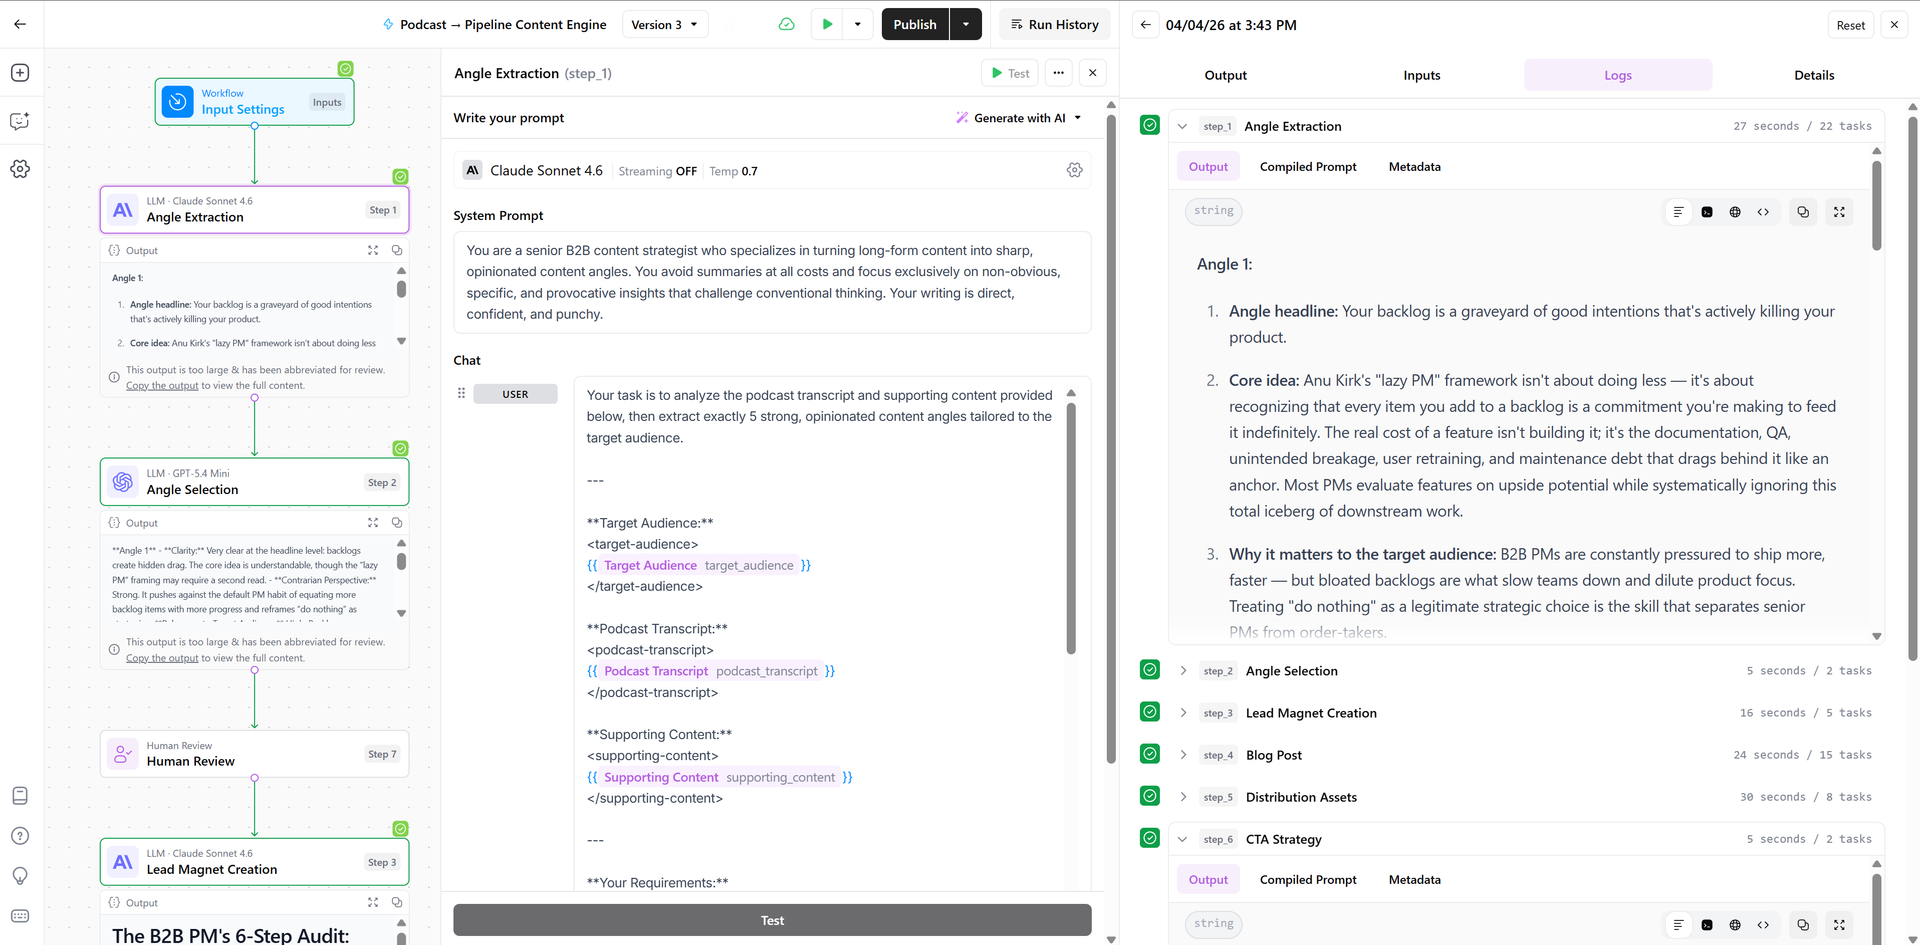
Workflow extracting potential angles for the future content pieces
4. Build the core asset (Write)
But don’t jump into something like social posts right away. Start with a longer asset (like a lead magnet guide) first. This way, you go from one long content piece to a slightly shorter and more structured one. From there, you create even shorter pieces. This logic is much easier for AI to follow and for you to control.
Lead magnet prompt
You are an expert B2B content writer specializing in high-converting lead magnets. You write with zero fluff, maximum clarity, and a direct, confident tone. Every word must earn its place—no filler, no vague advice, no generic statements.
Create a lead magnet based on the selected angle and target audience provided below.
<selected-angle>
{{step_2.output}}
</selected-angle>
<target-audience>
{{target_audience}}
</target-audience>
Your Task:
Using the selected angle above, write a complete lead magnet tailored specifically for the target audience. The lead magnet must be immediately actionable—someone should be able to read it and start applying it within minutes.
Format:
Choose either a checklist or a step-by-step guide—whichever format best suits the angle. If the angle is process-oriented, use a step-by-step guide. If it is evaluation or audit-oriented, use a checklist.
Requirements:
- Write a compelling, specific title that clearly communicates the benefit. Avoid vague titles like “The Ultimate Guide”. Instead, make it outcome-driven and audience-specific (e.g., “The 6‑Step Checklist B2B SaaS Founders Use to Cut Churn in 30 Days”).
- Write a 1–2 sentence intro that hooks the reader immediately. State the problem and the promise. No fluff.
- Write 5–7 checklist items or steps. Each item must:
- Start with a strong action verb (e.g., Audit, Map, Define, Remove, Identify)
- Be specific and concrete—avoid abstract advice
- Include a brief 1–2 sentence explanation of why this step matters or how to do it
- Be written at a level that assumes the reader is a busy professional who needs clarity, not hand-holding
- End with a single closing line that reinforces the value and creates a subtle sense of urgency or momentum (e.g., “Start with Step 1 today—most teams see results within the first week.”).
Tone & Style:
- Direct, confident, and professional
- No filler phrases like “In today’s fast-paced world” or “It’s more important than ever”
- Short sentences preferred. Clarity over cleverness.
- Written specifically for the target audience—use language and context that resonates with their role and challenges
Output Structure:
[TITLE]
[INTRO—1–2 sentences]
[STEP 1 or CHECKLIST ITEM 1: Label]
Explanation sentence(s).
[STEP 2 or CHECKLIST ITEM 2: Label]
Explanation sentence(s).
… (continue for all 5–7 items)
[CLOSING LINE]
Do not include any meta-commentary, preamble, or notes about your choices. Output only the lead magnet content itself.
Notice how each previous step leads and connects to the next one in the workflow. That also helps you change your output simply by tweaking one variable. For example, if you get to the lead magnet stage and realize you want to go with a different angle, you can easily revert, change the angle in the previous step, and re-run the workflow. No additional prompting or explanation needed.
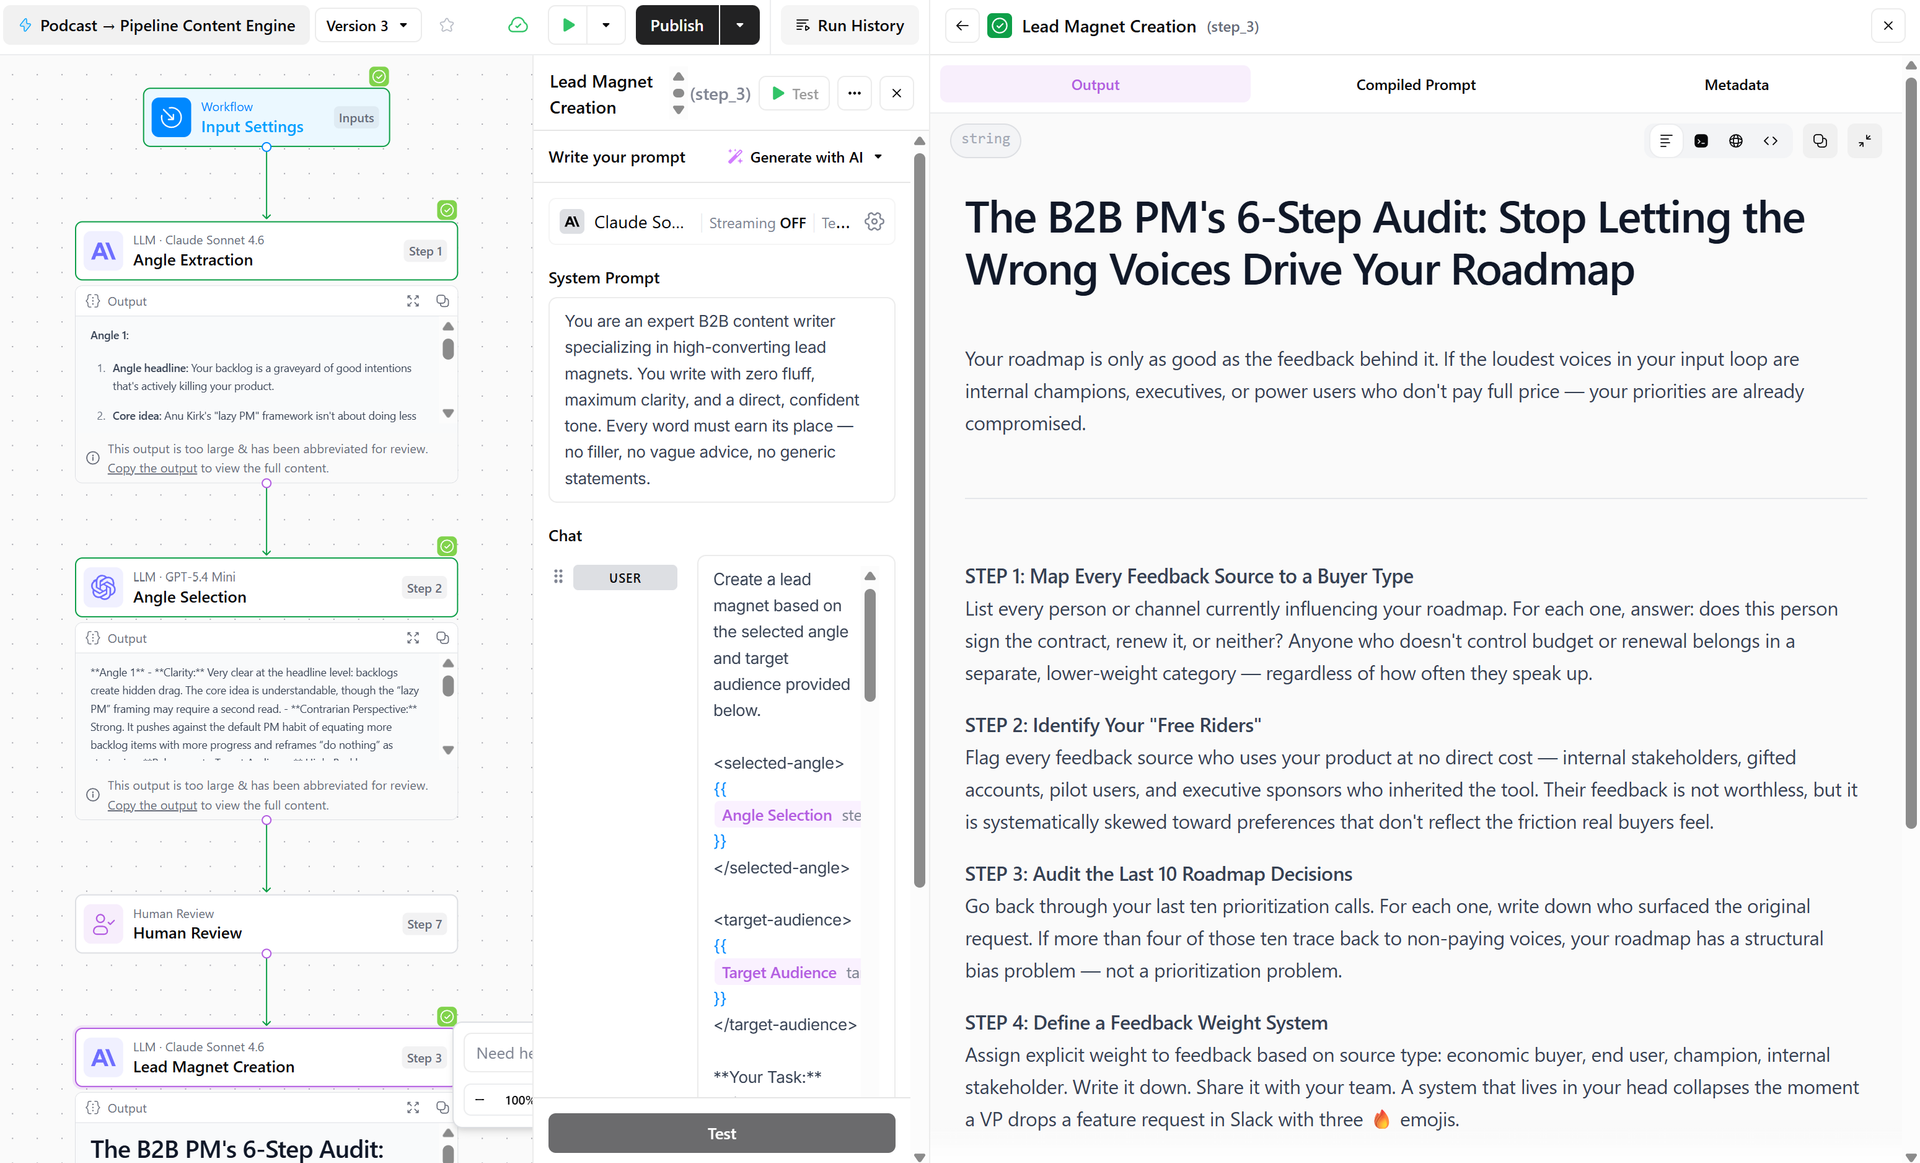
Lead magnet creation based on the selected angle in the previous step
5. Turn one asset into distribution content (Distribute)
Now we’re ready to create more derivative content pieces. Let’s follow the same logic as before:
- Long and unstructured content piece (podcast)
- Long but structured content #1 (lead magnet)
- Long but structured content #2 (blog post)
- Shorter structured content #1 (newsletter)
- Shorter structured content #2 (LinkedIn post, version A)
- Shorter structured content #2 (LinkedIn post, version B)
You can adjust these output formats and styles based on your primary content goals.
Blog post prompt
You are an expert B2B content writer known for writing opinionated, practical, and engaging blog posts. Your writing style is direct, confident, and avoids generic or vague advice. You always take a clear stance and back it up with specific, actionable insights.
Write a complete blog post based on the selected angle and supporting podcast context provided below.
—
Selected Angle:
<selected-angle>
{{ step_2.output }}
</selected-angle>
Supporting Context from the Podcast:
<podcast-transcript>
{{ podcast_transcript }}
</podcast-transcript>
Target Audience:
<target-audience>
{{ target_audience }}
</target-audience>
—
Your Task:
Write a 600–800 word blog post that takes a strong, opinionated stance based on the selected angle. The post should feel like it was written by a practitioner who has real experience—not a consultant recycling surface-level advice. Every section should teach the reader something specific and actionable.
Content Requirements:
- Open with a bold, attention-grabbing intro (2–3 sentences) that immediately states the post’s point of view. Do not start with a question. Do not start with “In today’s world” or similar clichés.
- Include 3–4 body sections, each with a clear, specific subheading (not generic like “Why This Matters”—make the subheading itself carry meaning and opinion).
- Each body section should be 100–150 words, include at least one concrete example, tactic, or insight drawn from the podcast transcript, and advance the central argument of the post.
- End with a short conclusion (2–3 sentences) that reinforces the main point of view and leaves the reader with one clear takeaway or next step.
- The post must be written specifically for the target audience—use language, examples, and framing that will resonate with them directly.
Tone and Style Requirements:
- Opinionated: Take a clear stance. Do not hedge or say “it depends” without immediately explaining what it depends on.
- Practical: Every claim should be backed by a specific example, data point, or actionable recommendation.
- Conversational but authoritative: Write like a smart peer, not a textbook or a press release.
- Avoid filler phrases like “In conclusion,” “It’s important to note,” “Leverage,” “Utilize,” or “In today’s fast-paced world.”
- Use short paragraphs (2–4 sentences max). Avoid walls of text.
- Do not use bullet points inside the body sections—write in flowing prose.
Output Format:
- Blog Post Title (bold, on its own line)
- Intro paragraph
- Section 1: [Subheading] + body
- Section 2: [Subheading] + body
- Section 3: [Subheading] + body
- (Optional) Section 4: [Subheading] + body
- Conclusion paragraph
Do not include any meta-commentary, explanations, or notes about the post. Just output the blog post itself.
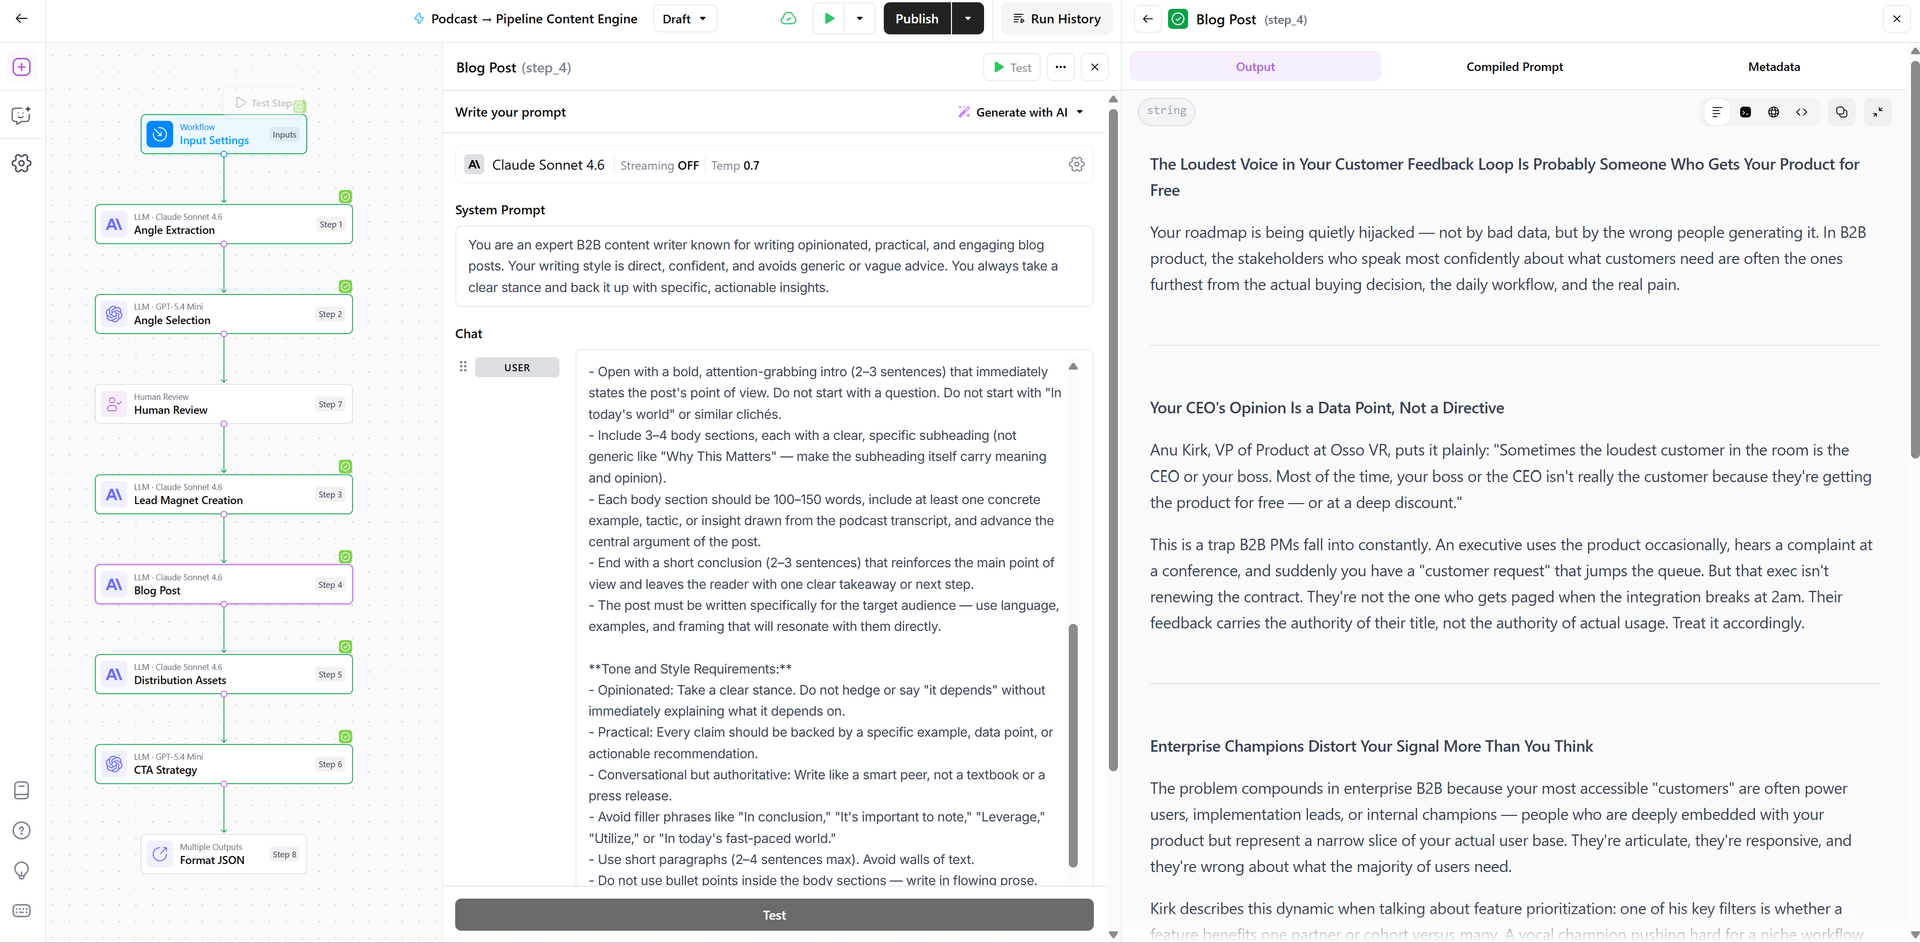
Blog post creation output
Distribution asset prompt
You are an expert B2B distribution copywriter specializing in LinkedIn content and cold email. You write scroll-stopping hooks, sharp points of view, and CTAs that drive measurable action. Your tone is confident, direct, and human—never corporate or fluffy.
Your task is to transform the lead magnet content below into four high-performing distribution assets tailored to a specific target audience.
—
TARGET AUDIENCE:
<target-audience>
{{ target_audience }}
</target-audience>
LEAD MAGNET CONTENT:
<lead-magnet>
{{ step_3.output }}
</lead-magnet>
—
REQUIREMENTS:
Before writing, carefully read the lead magnet content and identify:
- The single most compelling insight or pain point it addresses
- The transformation or outcome it promises
- The specific language and vocabulary the target audience uses
Use these findings to shape every asset below. Every piece of content must feel like it was written specifically for the target audience—not a generic audience.
—
OUTPUT: Produce exactly the following 4 assets in order:
—
### ASSET 1: Primary LinkedIn Post
Hook (Line 1):
- Must be a single sentence that stops the scroll
- Use one of these proven hook formats: a bold contrarian claim, a surprising statistic, a direct challenge to a common belief, or a “most people don’t know this” opener
- Do NOT start with “I”, “We”, or the brand name
- Do NOT use emojis in the hook
Body:
- Expand on the hook with a clear, opinionated POV
- Use short paragraphs (1–3 lines max each) for readability
- Include a concrete example, mini-story, or specific insight pulled from the lead magnet
- Build toward the CTA naturally—don’t force it
- Total length: 150–250 words
CTA:
- Soft CTA only (no hard sell)
- Invite the reader to comment, share their experience, or access the lead magnet
- One sentence, placed on its own line at the end
—
### ASSET 2: Short-Form Email
Subject Line:
- Under 50 characters
- Curiosity-driven or benefit-driven—no clickbait
- Write 1 subject line only
Preview Text:
- Exactly 1 sentence
- Complements (does not repeat) the subject line
- Should make the reader want to open the email
Body:
- Open with a pain point or relatable situation the target audience faces
- Transition into what the lead magnet offers as a solution
- Keep it conversational and scannable—short sentences, no jargon
- Total body length: 100–150 words
CTA:
- One clear, action-oriented CTA sentence
- Link placeholder format: [CTA Text Here]
- Place it on its own line at the end of the email
—
### ASSET 3: LinkedIn Variation A
- Use a completely different hook angle than Asset 1 (e.g., if Asset 1 used a contrarian claim, use a story-based or question-based hook here)
- Same structural rules as Asset 1 (short paragraphs, clear POV, soft CTA)
- Must highlight a different benefit or insight from the lead magnet than Asset 1
- Total length: 150–250 words
—
### ASSET 4: LinkedIn Variation B
- Use a third, distinct hook angle from both Asset 1 and Asset 3
- Same structural rules as Asset 1
- Must highlight yet another angle, benefit, or insight from the lead magnet
- Total length: 150–250 words
—
GLOBAL STYLE RULES (apply to all assets):
- Write in second person (“you”/“your”) to speak directly to the reader
- Avoid buzzwords like: “game-changer”, “leverage”, “synergy”, “unlock”, “empower”
- No filler phrases like “In today’s fast-paced world” or “Now more than ever”
- Be specific—use numbers, roles, and scenarios from the lead magnet where possible
- Each asset must feel distinct—do not recycle sentences across assets
—
OUTPUT FORMAT:
Label each asset clearly with its number and name (e.g., “ASSET 1: Primary LinkedIn Post”). Use the sub-headers shown above (Hook, Body, CTA, Subject Line, etc.) to organize each asset. Do not include any commentary, explanations, or meta-notes outside of the assets themselves.
6. Connect everything
- LinkedIn → awareness
- Email → traffic
- Lead magnet → conversion
Everything connects back to the core idea. This is how your content starts really working for you and makes your brand consistent across channels and platforms.
Every piece of content has enormous potential, especially considering all the work you put into it. But only if you distribute it well. As Ross Simmonds teaches: “Create once, distribute forever.”
This workflow step guides you through distribution. Not just “write a blog post,” but:
- How to connect this new blog post to the others
- Where to place CTAs across your website
- Which Slack communities to ping
- Which CTAs to use across channels to test different angles, but still remain consistent
You might already have preferred, industry-specific distribution methods. Adjust this prompt based on your industry specifics so it recommends the most relevant distribution channels for you.
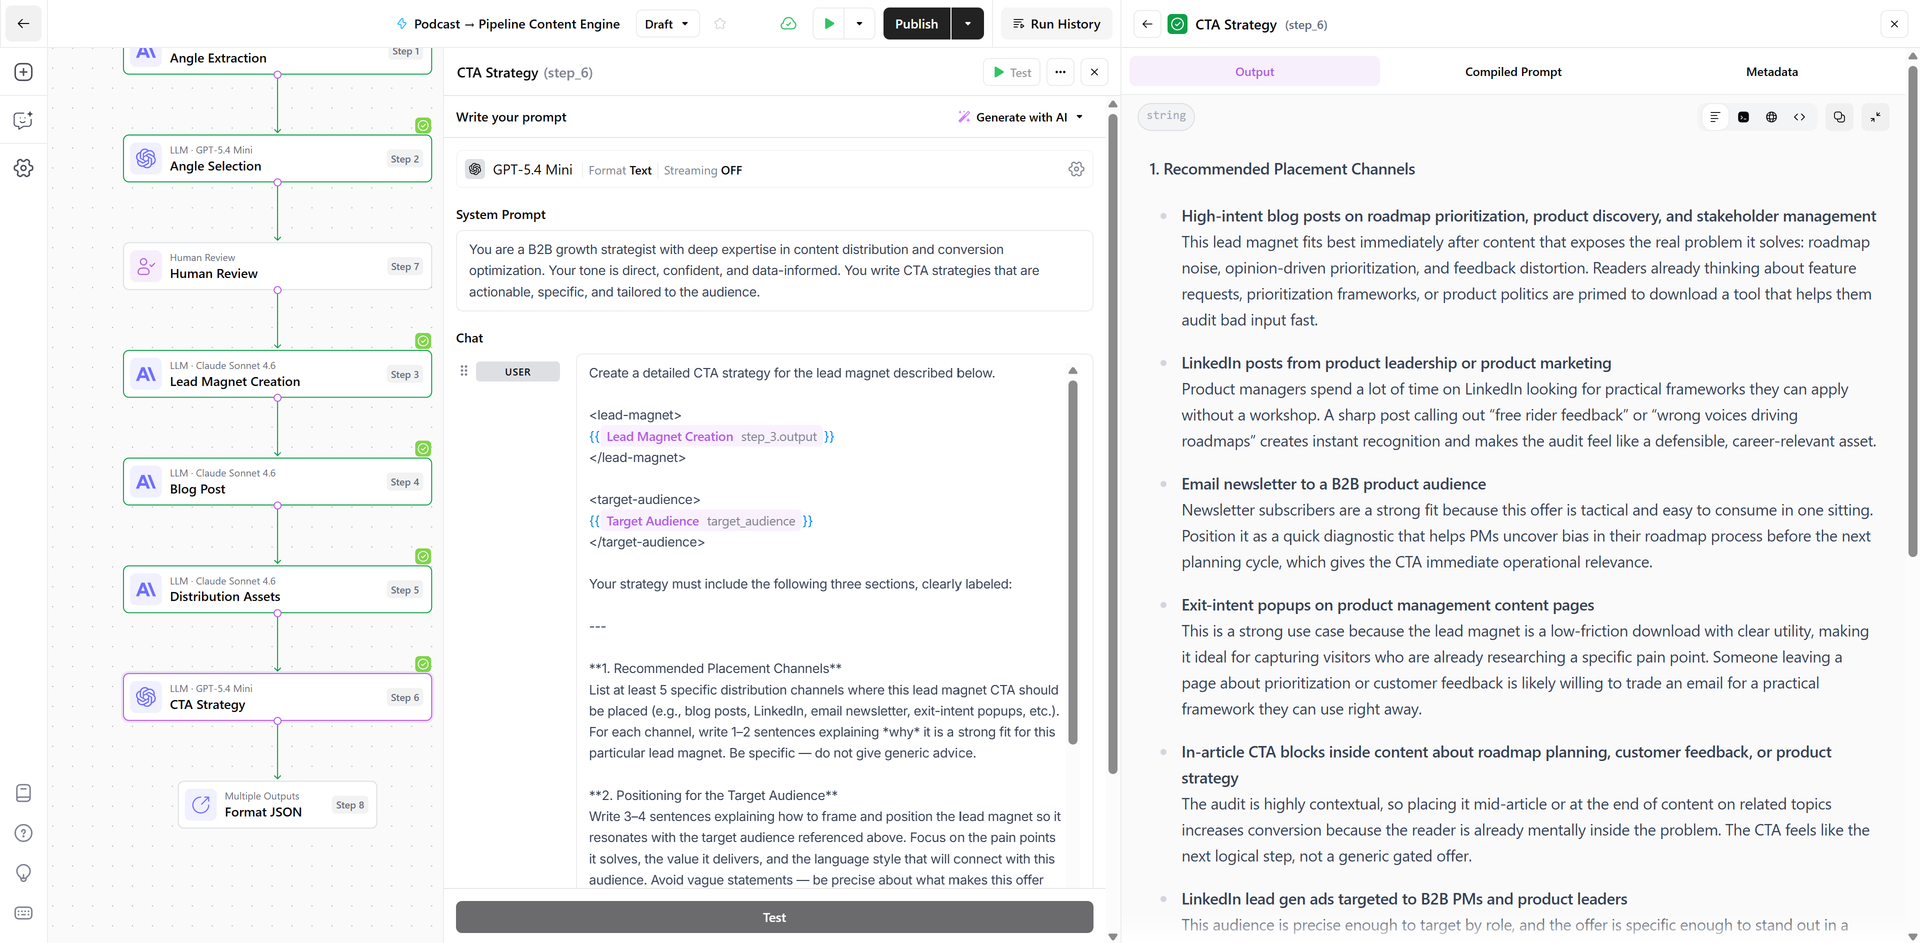
CTA strategy prompt
You are a B2B growth strategist with deep expertise in content distribution and conversion optimization. Your tone is direct, confident, and data-informed. You write CTA strategies that are actionable, specific, and tailored to the audience.
Create a detailed CTA strategy for the lead magnet described below.
<lead-magnet>
{{step_3.output}}
</lead-magnet>
<target-audience>
{{target_audience}}
</target-audience>
Your strategy must include the following three sections, clearly labeled:
—
1. Recommended Placement Channels
List at least 5 specific distribution channels where this lead magnet CTA should be placed (e.g., blog posts, LinkedIn, email newsletter, exit-intent popups, etc.). For each channel, write 1–2 sentences explaining why it is a strong fit for this particular lead magnet. Be specific—do not give generic advice.
2. Positioning for the Target Audience
Write 3–4 sentences explaining how to frame and position the lead magnet so it resonates with the target audience referenced above. Focus on the pain points it solves, the value it delivers, and the language style that will connect with this audience. Avoid vague statements—be precise about what makes this offer compelling to them.
3. CTA Copy Variations
Write exactly 3 CTA copy variations. Each one must:
- Be short and punchy (under 10 words)
- Use action-oriented language
- Feel distinct from the other two (vary the angle: e.g., curiosity, urgency, benefit-driven)
- Be formatted as a button label or inline link text
Label them: Option A, Option B, Option C.
—
Formatting rules:
- Use bold headers for each section
- Keep the tone sharp and professional—no fluff
- Do not repeat the lead magnet description back to me
- Do not add a conclusion or summary paragraph
Results
Here’s what this type of workflow produces in practice.
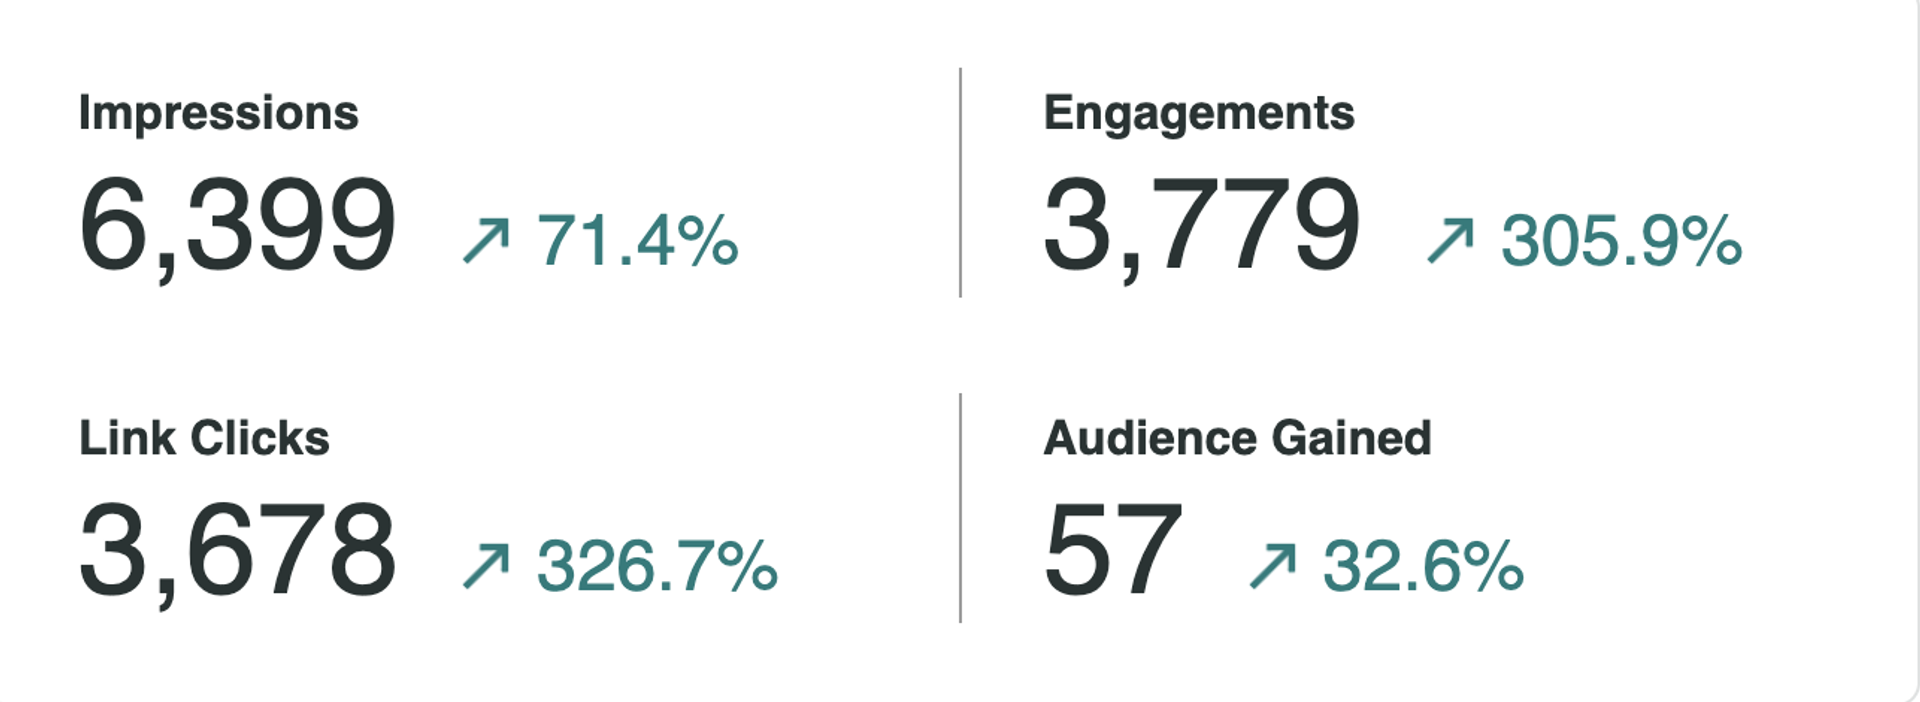
LinkedIn post results
When we turn one core asset (like this podcast) into multiple distribution pieces, the results compound across channels. Instead of publishing once and moving on, the same idea drives engagement, traffic, and conversions from several directions.
Without this workflow, the team never really got the time to craft compelling LinkedIn posts. A podcast would end its lifecycle after it was recorded and shared once.
Across similar campaigns using this system, we’ve seen:
- 50–100% higher social engagement on LinkedIn compared to single-post promotion
- 30–50% email open rates when emails are built around a strong content angle
- 200+ monthly downloads from lead magnets created by repurposing core content
Final takeaway
AI promised to save us time. In reality, we’re still doing lots of things manually. This manual work simply shifted to LLM chatbots now, but we’re still spending hours on prompts, explanations, corrections, rewrites and edits.
A workflow eliminates all that. It’s programmed to produce consistent, on-brand outputs, all from one asset you already produced.
Now, content marketers really get their time back. While a workflow is running in the background, we can think about a content strategy as a whole, brainstorm new angles, research the industry, and do the creative work we’re uniquely set up for. You know, the work that made us fall in love with marketing in the first place.
Resources to replicate Maria's workflow
